
If your Airstream has been sitting in storage during the cold months of winter, this is the time of year you start itching to get back on the road.
Assuming you winterized properly (or had your local service center do it), de-winterizing is a straightforward process that includes:
- Flushing out the RV antifreeze (if that's how you winterized)
- Sanitizing and filling the freshwater tank
- Inspecting essential systems
- Replenishing consumables you'll need for travel
- Cleaning and restocking the rig
Although a few tasks may be a bit time-consuming, de-winterizing is easy and frankly pretty fun. Just being back in the Airstream will inspire ideas about where you plan to travel this season, bucket list trips you've got planned, and upgrades you're considering. In Arizona, we get this same feeling in the fall, after our Airstream has sat in storage during the extreme summer heat.
Here’s our essential guide to this annual procedure. We've also distilled this guide into a simplified PDF checklist.
DOWNLOAD PDF CHECKLIST
If you prefer more detail than this article, the de-winterizing procedure is also outlined in "The (Nearly) Complete Guide to Airstream Maintenance, 2nd edition".
START WITH AN EXTERIOR WALK AROUND
Before you open the front door of the Airstream, inspect for exterior damage that may have occurred during storage. Look up for roof damage or debris, around the sides for indications of rodent or bird damage or vandalism, and beneath for any dangling wires or propane lines that need to be investigated.
If you own an Airstream trailer, also check that the belly pan is intact and not in need of any rivet replacements.
INSPECT ESSENTIAL SYSTEMS
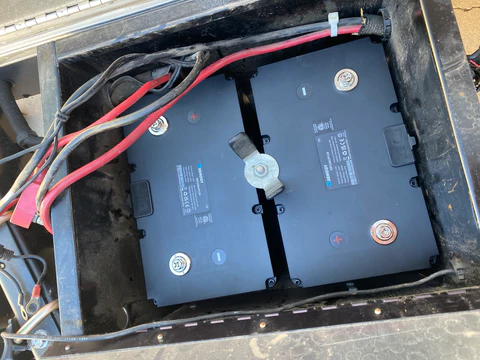
1. Batteries
If you disconnected or removed the batteries, put them back and switch the battery disconnect to the ON or USE position.
Inspect the battery casings for cracks, and check the top and sides for bulging or leaks. If you see any of these things, don’t attempt to charge the batteries—replace them.
Plug the trailer or motorhome into power and give the batteries a few hours to charge (“lithium” or LiFePO4 batteries can charge fully in just 1-4 hours, and lead-acid or AGM batteries may take up to 8 hours).
After you unplug, verify that the batteries are holding the correct charge by checking the voltage. You may have a voltage meter built into the RV (like the SeeLevel monitor commonly found on most late-model Airstreams). If not, you can use a handheld voltage meter. Lead acid batteries should hold at least 12.6 volts when fully charged, with everything in the RV turned off. Lithium batteries should hold at least 13.3 volts when fully charged.
Batteries don’t last forever. The de-winterizing process is a good opportunity to verify that the batteries are holding their charge as they should. If they aren’t, replace them now so you don’t get stuck with dead batteries during the travel season.
If your Airstream has the type of lead-acid batteries that have removable caps on the top, check the water level in them and add some distilled water if needed. Wear rubber gloves and use eye protection when doing this, and keep some baking soda on hand to neutralize any splashes.
2. Water system
First, flush out the RV antifreeze. To do this, fill the fresh water tank. Then turn on the water pump and let the water run through the entire system. Turn on the kitchen sink, bathroom sink, indoor and outdoor showers, and keep them on until all the pink is gone and only clear water runs through them. (You don't need to worry about the toilet.)
Second, sanitize the fresh water system. This gives you a safe plumbing system for the start of the season. Heres our practical guide that explains how to do that.
IMPORTANT: If you have a water heater with a tank (not “tankless”), move the winterization bypass on the water heater back to the normal operating position before you sanitize. This way you’ll sanitize the water heater’s tank at the same time.
3. Gas system
Inspect the condition of the propane hoses to be sure they aren't cracked or worn like the photo below.

If you see signs of either, replace them. If you have the GasStop Safety Shutoff, you'll find stainless, braided 90-degree hose replacements here.
In addition, perform a slow leak test – an important safety check any time you put away or retrieve your RV from storage. If you have GasStop, this process is easy. This video explains it:
Both of these procedures are described in more detail in this Quick Guide to RV Propane Maintenance.
4. Tires
Check the air pressure on all the tires, including the spare. If any pressures are low, add air. It's helpful to have portable air compressor on hand for this. And if you want to make checking the spare tire pressure easier this season, consider the EasyAIR TIre Inflation System, which moves the spare tire valve to a place that's easy to reach.
Check all the tires for wear, cracks, and damage. This short video explains how to do this, and what you are looking for.
If you think you might need to replace the tires, this topic is covered in detail in The (Nearly) Complete Guide to Airstream Maintenance.
If you have a tire pressure monitoring system (TPMS) – highly recommended for safety – fire it up to make sure the monitor and all sensors are working.
If you find a sensor is not connecting / displaying on the monitor, it’s most likely because the sensor battery needs to be replaced. Replace all dead sensor batteries before your first trip.
5. [For trailers only] Hitch, 7-way plug, and brakes
Lube the hitch as recommended by the manufacturer and hitch up the trailer.
Once you’re hitched, test and verify that all the trailer and brake lights are working properly.
Inspect the 7-way plug for corrosion – especially if you found any issues with brake or trailer lights not working or working intermittently. The most common reason for brake and trailer lights not working properly is a dirty or corroded 7-way plug.
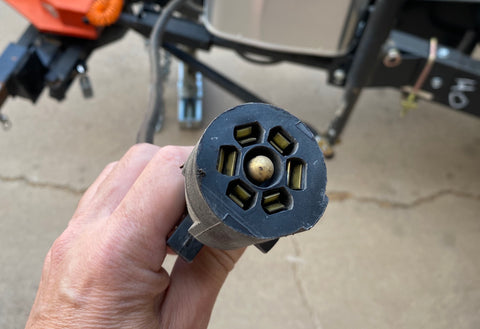
This blog, or the video below, explains how to clean and maintain the 7-way plug and other electrical connections to avoid this problem. We include the products and a tool needed to perform this simple maintenance task in our Maintenance Essentials Kit.
Finally, verify that the brakes and brake controller are working properly by doing a few test stops at low speed. As you go, listen for any strange noises from the hitch and trailer that might indicate a need for repair or adjustment.
If you find any issues with the brake controller, address them with a service technician before you travel. It is not safe to travel without a working brake controller. You don’t want this to be a trip-killer on your first day of travel this season (ask us how we know!), so address it now.
6. Appliances
Before you turn on any appliances: walk around the Airstream and open the exterior access hatches for the refrigerator, water heater, and furnace.
Inspect for spider webs, wasp nests, leaves, or any other debris that might be clogging the exhaust vents or burners and remove them.
Make sure you've got propane in at least one tank. Open the propane tank valve for that tank and verify that the regulator shows green.
Now turn on each appliance and make sure it's working properly:
- Furnace
- Refrigerator
- Water heater
- Stove (and oven if equipped)
- Lights
- Water pump
- Vent fans
- Power stabilizers or power awning if you have one.
If you have 30-amp or 50-amp power available, test the microwave oven (if equipped), air conditioner and/or heat pump as well.
INSPECT THE INTERIOR
Anything can happen while an Airstream or other RV is quietly tucked away for the winter. An interior inspection will ferret out unpleasantries you will need to address.
1. Check for leaks
Inspect the inside and outside of all cabinets for signs of leaks that might have occurred over the winter. If you see signs of water damage, track down the origin of the leak and get it addressed before you travel. This blog will help you troubleshoot.
2. Do a “sniff test”
Open and sniff inside drawers, cabinets, and the trash pull-out, as well as around drains. If anything smells weird, clean or otherwise address it. Get your travel partner to perform this check as well – he or she might smell something you haven’t.
3. Look for signs of rodents
While you’re sniffing through drawers and cabinets, watch for droppings or chewed up material. Check the corners of upper cabinets and the floor under the dinette.
4. Open all the windows
Make sure none are sticking shut. If you can’t get a window open because the gasket is sticky, don't force it open by the handles—it may break! Instead, loosen the gasket from the outside with a credit card, and then lubricate it as described in the maintenance guide.
5. Test the fire extinguisher
Push the little green button on the top. It should pop back up. Also look at the label for the expiration date. If the fire extinguisher needs replacing, we recommend the ELEMENT Fire Extinguisher, which never expires, is super lightweight, makes no mess, and is not harmful to people or pets.
6. Address squeaks and other nuisances
Open drawers and cabinets and lubricate the ones that are sticking or squeaking. We like Boeshield lubricant for this task.
If you have drawers that are no longer closing or latching properly, it's probably a worn out cabinet latch. Find replacement "cabinet grabber" latches for these here.
INSPECT AND REPLACE ALL "CONSUMABLES"
If you use a water filtration system, replace the filters. These should generally be replaced every 3 months or after any long period of storage.
Take a look inside the First-Aid Kit and see if there is anything that has expired and needs replacement.
Install fresh 9-volt batteries in the smoke and/or Carbon Monoxide detectors. After you’ve replaced each, press the Test button on each unit. It should beep loudly.

Check your stashes of consumables such as tissues, toilet paper, paper towels and replenish.
CLEAN THE AIRSTREAM INSIDE AND OUT
With all the maintenance and inspection tasks complete, finish the de-winterizing process by giving the Airstream a full cleaning. You may have done a lot of this before putting your Airstream to bed in the fall, but if not:
- Scrub the shower and bathroom
- Clean the kitchen – wipe out all cabinets, drawers, and microwave
- Vacuum and damp-mop the floors
- Wash all bedding
- Wipe down the dinette cushions and the exterior of all cabinets
If you have dirt/grease on upper cabinets that won’t come off with regular cleaning, try Mr. Clean’s Magic Eraser. It’s the only product we’ve found that gets the overhead cabinets of our 2020 Airstream Globetrotter clean and white again.
Finally, give your RV’s exterior a bath. Most truck washes will do this for you, but if you don’t have one nearby, check for a mobile RV wash service or find a car wash that has extra high bays for RVs.
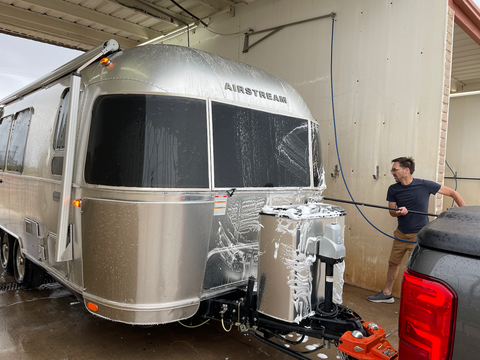
For tips on cleaning the exterior of an Airstream, refer to this Quick guide to maintaining an Airstream’s exterior.
When you’ve completed the items on this checklist your RV is de-winterized and ready for another fun season of travel. Plan a trip and hit the road!
DOWNLOAD PDF CHECKLIST
2 comments
Randall Schultz
Is a good idea to rotate the tires on a tandem axle Airstream. I have a 27’ Flying Cloud , the back set of tires are wearing a little more than the front ones, the back tires slide when turning sharp.
John McG
Even those of us fortunate to live in warmer climates need to do a “Wake-up” process with almost the same elements if our trailer hasn’t been used for several months over the winter. Sanitizing tanks, checking propane systems and hoses for leaks, looking for leaks, etc are all just as important even if the trailer wasn’t formally winterized. Maybe just calling it an extended “Spring Cleaning” is the right answer… (and replace those batteries in the Tire Monitoring System also..)